Skip to main content Scroll Top
art Tip

Bring Your Drawings to Life with Foreshortening!

🎨 Art Tip: Use Foreshortening to Bring Depth to Your Drawings!

Have you ever drawn someone reaching forward and thought, Why does this look so flat? You’re not alone! That tricky problem has a name — foreshortening — and once you understand it, your drawings will suddenly start to pop right off the page.

What Is Foreshortening?

Foreshortening is what happens when something points toward or away from you in space. Parts that come closer look shorter and wider, while parts that stretch back look smaller and thinner.

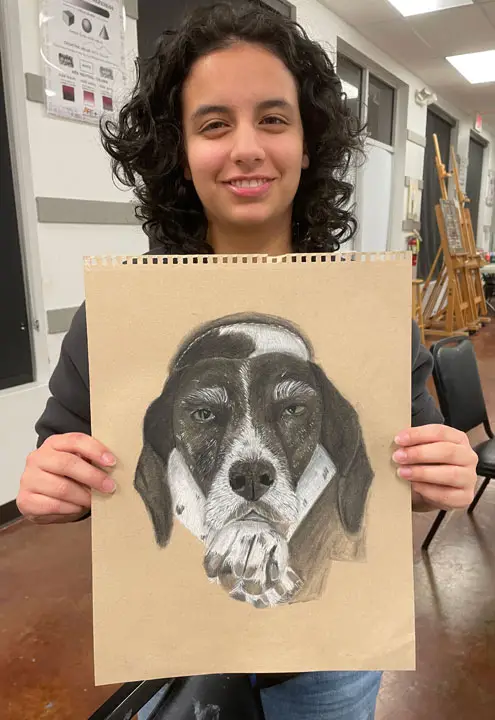
You see it every day — in a photo of someone’s hand reaching out, or a dog lying down with its paws toward you. The shape hasn’t changed — only your view of it has.

Learning to draw that illusion is like unlocking a secret to making your art feel truly three-dimensional.

Why It’s So Powerful

Foreshortening adds life and perspective to your art. It’s what makes a flying superhero feel like they’re bursting forward, or a flower seem to lean toward the viewer. It creates energy and realism — the sense that what you drew exists in real space.

This teenage student shows foreshortening by drawing the dog’s face and paws big and up close, while using just a small bump to suggest the rest of its body is behind his head.
This student uses foreshortening to create a strong sense of depth in her graphite drawing of a plane. By making the back of the plane larger and gradually reducing the size toward the front, she gives the impression that it’s soaring away from the viewer.

How to Practice Foreshortening (and Have Fun With It!)

  1. Start with Simple Shapes
    Every complex object can be broken down into basic forms — like boxes, cylinders, or spheres. Try drawing a cylinder (like an arm) pointing toward you. The closer end should look larger, and the far end, smaller.

  2. Let Shapes Overlap
    Overlaps are the secret to depth! If one part of a figure or object covers another, that overlap shows what’s in front. Don’t avoid it — use it to your advantage.

  3. Compare Near and Far
    Look closely: the part that’s closer to you will always appear bigger. A hand reaching out might look almost as big as a face! That’s normal — and it’s what gives foreshortening its power.

  4. Use Light Guidelines
    A few gentle lines can help you keep things lined up in space. Think of them as invisible scaffolding — they’ll help your forms stay solid and believable.

  5. Practice from Real Life
    Hold your pencil toward your face, take a selfie from a dramatic angle, or draw a toy car coming right at you. Real-life observation teaches you how angles and distances really work.
     
  6. Exaggerate to Learn.
    When you’re first practicing, don’t be afraid to push it! Make the closest part bigger and the farthest smaller. Once you see how it works, you can always tone it down later.

Final Thought

Foreshortening might sound technical, but it’s really about seeing space differently — and once you start seeing it, your drawings will never look flat again.

So grab your sketchbook, pick something that points toward you — a hand, a shoe, even a coffee mug — and give it a try. You’ll be amazed at how much life and depth you can add with just a few smart adjustments.


Here’s a great example of foreshortening in a human figure drawing! This 12-year-old student drew the figure’s hand much larger than the rest of the body, creating the illusion that the arm is reaching out toward the viewer.

(512)-812-8070

Cedar Park

3621 E. Whitestone Blvd.
Suite 700.
Cedar Park TX 78613

Northwest

10401 Anderson Mill Rd
Suite 108-B
Austin, TX 78750

Southwest

5424 W US Hwy 290 Service Rd,
Suite 110
Austin, TX 78735

Shopping Cart
Close
Cart
  • No products in the cart.
Your cart is currently empty.
Please add some products to your shopping cart before proceeding to checkout.
Browse our shop categories to discover new arrivals and special offers.